Installation begins with a roof, wall, or ceiling survey, not with unrolling the membrane. By following the sequence from moisture checks and air-gap planning through cutting, fastening, sealing, and inspection, you can judge whether the finished work is continuous, safe, and suited to the building assembly.
Key takeaways
- Survey every surface, obstruction, damp patch, and heat hazard before fitting.
- Keep the reflective face beside a continuous air gap.
- Overlap, tape, and seal joints around fasteners, edges, and penetrations.
- Reject installations with tears, crushed air pockets, open seams, or trapped moisture.
1. What do installers inspect and prepare before fitting bubble insulation?
The first bubble insulation installation step is a measured survey of every roof bay, wall, ceiling, and under-deck area. Record lengths, widths, purlin spacing, parapet height, drains, skylights, pipes, ducts, exhausts, wiring, rooftop equipment, existing insulation, damp patches, rust, loose waterproofing, sharp fasteners, and any place the membrane could touch a hot flue.
1. Repair active leaks before covering the roof; bubble film must not conceal a failed waterproofing layer. On Delhi roofs, remove dust, loose mortar, bird waste, and debris, then let the substrate dry after monsoon moisture. Repair or remove loose waterproofing, clear blocked drainage, and replace or cap protruding screws.
2. Confirm the product’s declared temperature limit, fire classification, compatible foil tape, sealant or adhesive, and approved fixing method. Keep a measuring tape, straightedge, scissors or utility knife, foil tape, compatible sealant or adhesive, mechanical fasteners, and washers ready before cutting.
The bubble insulation installation process in Delhi buildings fails quickly when crews improvise materials after cutting starts.
3. Mark electrical cables, junction boxes, and earthing routes before covering them. Foil can bridge live terminals or trap heat around equipment. Check clearances from flues, chimneys, boilers, halogen lamps, and other hot sources against the product limit.
These bubble insulation installation steps prevent a clean-looking membrane from hiding water, electrical, drainage, or fire hazards. Finish the survey with photographs and a marked plan showing penetrations, defects, and areas requiring repair.
2. How is the reflective air gap planned for each roof or wall assembly?
The foil face must look into a continuous, sealed air cavity; pressed against concrete, masonry, metal roofing, timber, or another insulation layer, it loses much of its reflective effect. That condition controls reflective bubble insulation fitting.
For each assembly, plan the support and cavity as follows:
- Metal roof: fix the membrane beneath rafters or purlins, leaving the roof sheet separated from the foil by the cavity between them.
- Concrete deck or solid roof: use battens, furring strips, or spacers so the membrane cannot compress against the deck.
- Wall or ceiling: support the membrane on framing, with the shiny face toward the room-side or ventilated cavity.
- False ceiling: place the membrane above the ceiling only when a real room-side air space remains.
The shiny surface faces the adjacent air space, whether that space is above, below, or beside the membrane. Orientation does not mean “foil side always toward the roof.”
In the bubble insulation installation process in Delhi buildings, the installer measures every bay instead of stretching a roll across irregular framing. The layout must preserve:
- perimeter turn-ups and specified laps;
- clearance around purlins and service routes;
- a continuous cavity without sagging or compression.
The tested thermal resistance or U-value of the complete assembly, including its air gaps, matters more than roll thickness. Compare that result with the project specification or Energy Conservation Building Code requirement before approving the detail.
3. What happens when bubble insulation is cut, fixed, overlapped, and sealed?
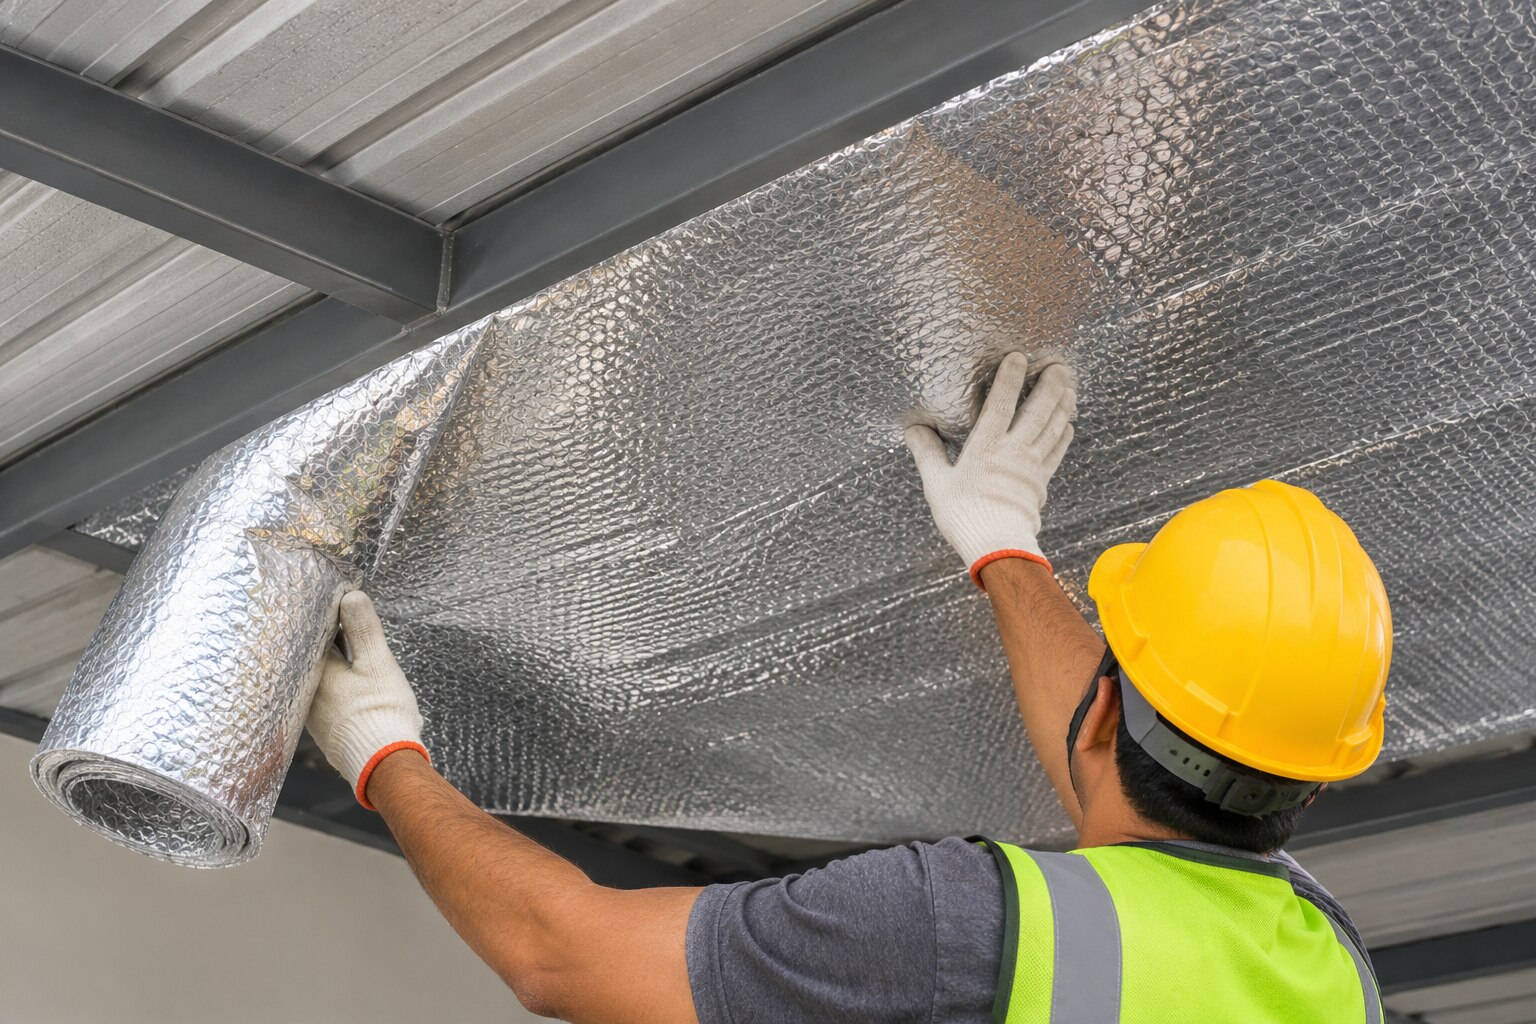
After each bay is measured, the crew cuts the sheet with a straightedge and utility knife or scissors, allowing for the specified lap and perimeter termination. These bubble insulation installation steps prevent waste without relying on stretched material. Pulling the laminate tight can split foil around fasteners and leave gaps.
Fixing begins at a straight edge and moves across the bay. Installers use only the fasteners, washers, staples, or adhesive approved for that laminate and substrate. Washers spread screw loads across the film; excessive tightening crushes bubbles and creates unnecessary punctures.
Adjacent rolls receive the manufacturer’s specified overlap. Cover the entire joint with compatible foil tape or sealant, not ordinary cloth tape, which is not a durable hot-roof air or vapour seal. Use the same treatment on cuts, tears, wall junctions, and service penetrations.
At each opening or edge, apply the matching detail:
- Pipes, ducts, skylights, and exhausts: cut neatly, bring the membrane to the flashing or frame, then seal or clamp it.
- Parapets: turn the edge up or terminate it against a prepared surface and seal it.
- Roof drains: cut around the drain so water flows freely without a raised obstruction.
The insulation does not replace flashing. Keep paint, plaster, mortar, dust, and opaque coatings off the foil. Correct bubble insulation roofing installation in Delhi preserves the reflective air cavity rather than merely covering the roof.
4. How does the installation change on concrete roofs, metal sheets, walls, ceilings, and under-decks?
The substrate controls both the fixing method and the protection of the reflective air gap. In bubble insulation roofing installation in Delhi buildings, do not treat a concrete deck, metal sheet, masonry wall, and false ceiling as interchangeable surfaces.
1. Under metal roofing, fix the membrane to purlins or rafters and keep a continuous cavity between the foil and roof sheet. Protect it from sharp sheet edges, protruding screws, hot flues, chimneys, boilers, halogen lamps, and any source above the product’s declared temperature limit and required clearance.
2. Over a concrete roof with existing waterproofing, avoid puncturing the waterproofing unless the approved project detail allows it. Battens, compatible adhesive, or a separate support grid can hold the membrane without compressing the foil against the deck. Repair leaks first; the membrane will not correct a failed slab or waterproofing layer.
3. A tiled roof needs a stable underside or support frame, not loose film placed between tiles. For reflective bubble insulation fitting, preserve the cavity beside the foil rather than trapping it against tiles or timber.
4. On masonry walls, face the foil toward the room-side or cavity-side air space and secure it to battens or framing. Direct plaster contact defeats the reflective surface.
5. Above a false ceiling or under-deck, support the membrane independently, seal laps and penetrations, and keep lights, ducts, access panels, and fire equipment serviceable. In an air-conditioned room, sealed joints also restrict humid monsoon air entering the cooler assembly.
Shiv Sales Corporation can provide the laminate’s fixing guidance, temperature limit, fire information, and tested assembly data before you choose tape, adhesive, or fasteners.
Related product
 | Bubble Insulation Best Bubble Insulation Trader in Delhi Shiv Sales Corporation is recognized as a trusted supplier of high-quality bubble insulation products and... View product → |
5. How is a completed bubble insulation installation checked and accepted?
Acceptance starts with a bay-by-bay walk across the membrane, not a glance at the visible centre. The inspector checks continuous foil coverage, an uninterrupted air gap beside the reflective face, secure fasteners with supported edges, sealed laps, closed perimeter terminations, and intact repairs at every penetration.
| Inspection point | Acceptable condition | Reject or repair when |
|---|---|---|
| Edges and joints | Fasteners hold supported edges; laps are fully sealed | Foil is loose, compressed, torn, or joints are open |
| Penetrations | Sealed or clamped around parapets, roof drains, skylights, pipes, ducts, purlins, electrical boxes, ceiling lights, and rooftop equipment | Gaps remain, flashing is missing, or repairs are damaged |
| Drainage and heat | Drains remain open; membrane does not sag into standing water or touch a hot appliance | Water is trapped or the film contacts a hot surface |
| Electrical safety | No foil bridges exposed electrical terminals | Conductive foil reaches live terminals |
The team removes adhesive backing, foil scraps, dust, and loose fasteners from the roof. They also confirm that the bubble insulation installation steps left no obstruction or concealed leak.
Before a false ceiling or wall lining closes the assembly, photograph the work and mark joints, penetrations, access points, and interrupted areas on a plan. Record the product batch, installation date, substrate, air-gap arrangement, tape or sealant, fixing pattern, and later-access areas.
For the bubble insulation installation process in Delhi buildings, compare the complete assembly’s tested thermal resistance or thermal transmittance with the specified ECBC requirement. A shiny roof still fails acceptance if foil is compressed, joints are open, or leaks remain.
Frequently asked questions
What do installers inspect before fitting bubble insulation?
They measure each roof bay, wall, ceiling, and under-deck area, then record purlins, drains, skylights, services, equipment, damp patches, rust, loose waterproofing, sharp fasteners, and hot flues.
Why does bubble insulation need a reflective air gap?
The reflective surface reduces radiant heat transfer only when it faces a continuous air space. Pressing it directly against concrete, metal, or another material reduces that function.
How is bubble insulation cut, fixed, overlapped, and sealed?
Installers cut sheets around obstacles, avoid crushing the bubbles, overlap adjoining sheets, and seal seams, edges, penetrations, and fastener points with compatible tape or flashing details.
How does fitting differ across roofs, walls, ceilings, and under-decks?
Concrete roofs require a planned support and waterproofing detail; metal roofs need protection from sharp edges and fasteners; walls and ceilings need stable framing; under-decks require safe access and drainage protection.
How is a completed bubble insulation installation checked?
The inspection checks coverage, air-gap continuity, secure fixings, sealed overlaps, intact surfaces, protected penetrations, clear drains and vents, and the absence of trapped moisture or contact with hot flues.
Keywords